Difference between revisions of "LED sleeve"
m (added my tube experience (I recommend a ground plug+reduced tube for easy travel and installation)) |
(add information on firmware, fixed link rot) |
||
| Line 55: | Line 55: | ||
Some important notes: | Some important notes: | ||
| − | * | + | * the correct winding is top to bottom, clockwise (seen from the top, i.e.: from top right to bottom left) |
| − | * I had old Arduino pro minis with old bootloaders | + | * I had old Arduino pro minis with old/wrong bootloaders: for these kinds, select Arduino Uno to be able to upload any sketch |
| − | * | + | * make sure you don't use other diameter pipes (like 75mm drain pipes) or your image will be garbled |
* to solder the headers on the solder side, you have to offset them from the PCB (I used scrap plastic from zip ties) | * to solder the headers on the solder side, you have to offset them from the PCB (I used scrap plastic from zip ties) | ||
* the power supplies on ebay are '''very dubious!''' They are refurbished (sloppy) and given the wire gauge I strongly doubt the were built for 8A continuous use. Don't leave them unattended | * the power supplies on ebay are '''very dubious!''' They are refurbished (sloppy) and given the wire gauge I strongly doubt the were built for 8A continuous use. Don't leave them unattended | ||
| Line 63: | Line 63: | ||
* the Arduino libraries can be a pain to find and/or get working. YMMV. | * the Arduino libraries can be a pain to find and/or get working. YMMV. | ||
* for added safety, crimp your stranded wires; it's not worth risking fire for a couple of cents extra | * for added safety, crimp your stranded wires; it's not worth risking fire for a couple of cents extra | ||
| + | * regarding the firmware<ref>[https://github.com/bobo1on1/loc_controller controller firmware]</ref>, make sure to install these specific library versions (and no higher as these are the last working versions for this project): | ||
| + | ** EtherCard 1.0.0<ref>https://github.com/njh/EtherCard/releases/tag/1.0.0</ref> | ||
| + | ** FastLED 3.3.2<ref>https://github.com/FastLED/FastLED/releases/tag/3.3.2</ref><ref>https://fastled.io/</ref> | ||
=== also see === | === also see === | ||
| − | * [https://bitlair.nl/Projects/Ohm_led_strip_sleeves Ohm led strip sleeves on Bitlair] | + | <references /> |
| − | * [https://tkkrlab.nl/wiki/OHM_LEDS | + | ** [https://bitlair.nl/Projects/Ohm_led_strip_sleeves Ohm led strip sleeves on Bitlair] |
| − | * [https://eventinfra.org/ EventInfra (they loan these sleeves and have 90+ of them)] | + | ** [https://wiki.tkkrlab.nl/tkkrlab.nl/wiki/OHM_LEDS.html on TkkrLab] |
| − | * | + | ** [https://eventinfra.org/ EventInfra (they loan these sleeves and have 90+ of them)] |
| − | * [https://github.com/AlbertVos/bitlair-ohm2013-ledstrip-contol bitlair-ohm2013-ledstrip-contol] | + | ** [https://github.com/AlbertVos/bitlair-ohm2013-ledstrip-contol bitlair-ohm2013-ledstrip-contol] |
| − | * [https://bitlair.nl/Projects/ledcat new ledcat control software] and its [https://github.com/polyfloyd/ledcat github page] | + | ** [https://bitlair.nl/Projects/ledcat new ledcat control software] and its [https://github.com/polyfloyd/ledcat github page] |
Revision as of 20:15, 25 June 2024
| Project: LED sleeve | |
|---|---|
| Featured: | No |
| State | Completed |
| Members | Xopr |
| GitHub | No GitHub project defined. Add your project here. |
| Description | ART-net controlled cylindrical-ish display |
| Picture | |
| No project picture! Fill in form Picture or Upload a jpeg here | |

Contents
synopsis
LED sleeve, also known as OHM2017 torch is a project xopr wanted to do a long time, so at one blue Monday in the summer of 2020, he decided to just build one (two actually).
I didn't want to take the trouble to order descent PCBs so I piggybacked an ENC28J60 module to an Arduino pro mini (that's all there is to, actually).
build
The list you need to build one:
- 1 Ledstrip WS2812 5m30L/m
- 1 Arduino pro mini (5V)
- 1 ENC28J60 or ENC28J60 mini with a separate LM1117 regulator
- 1 power supply 5V8A (laptop PSU form factor)
- 1 prototype PCB 13x16 or 8x20 holes (wide v.s. narrow/mini)
- 3x2 screw terminals
- 1 header 2x6/2x5 (for ENC28J60 regular v.s. mini)
- 33cm rainwater drainage (HWA or "hemelwaterafvoer") tube 70mm
- 1 lid 70mm
- 4 wire crimp terminal 1.5mm (recommended)
- 1 or 2 wire crimp terminal 0.5mm or 0.75mm (recommended)
- 0.4m cable 2x0.75mm
- 1 wooden base ~70mm diameter
- 2 large zip ties (to fix the LED strip)
- 3 or 4 wood screws (for the base)
- 1 network cable
- 1 power cable
- 10cm shrink wrap (recommended)
- 2/12th paired screw terminals (recommended)
- 1/4th thick broom stick with a large screw (optional)
- either
- flag pole holder (optional)
- or ground screw with 2m tube (optional; xopr used 3 reduced/verjongde 64cm tube coming off a trampoline)
The PCB is just a connector between ENC28J60 and Arduino (AVR)
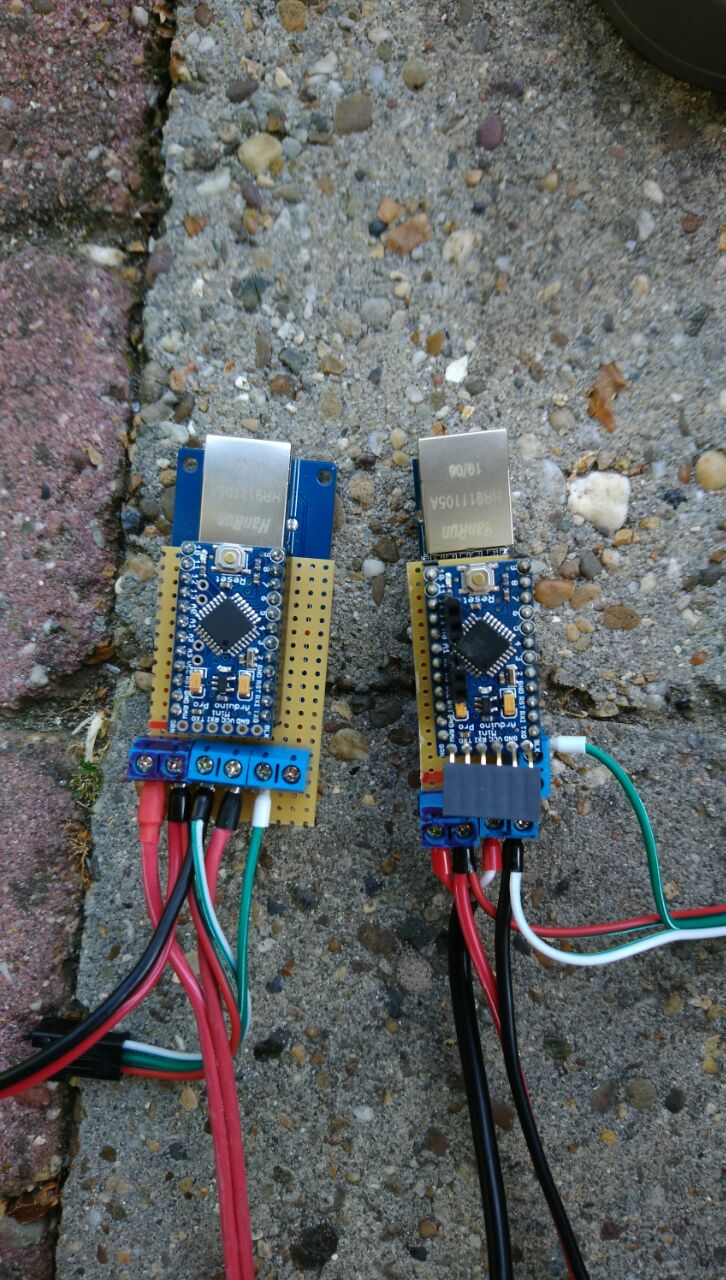
PCB

PCB solder side
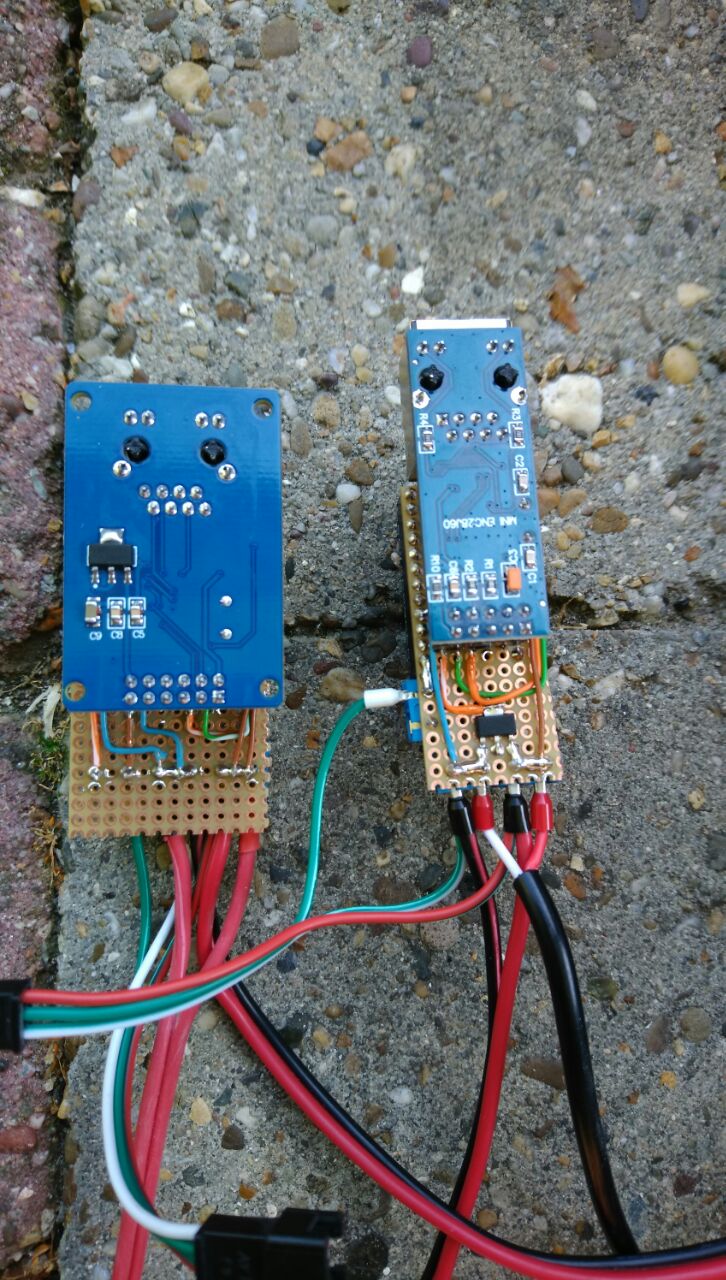
PCB solder side occupied with ENC28J60
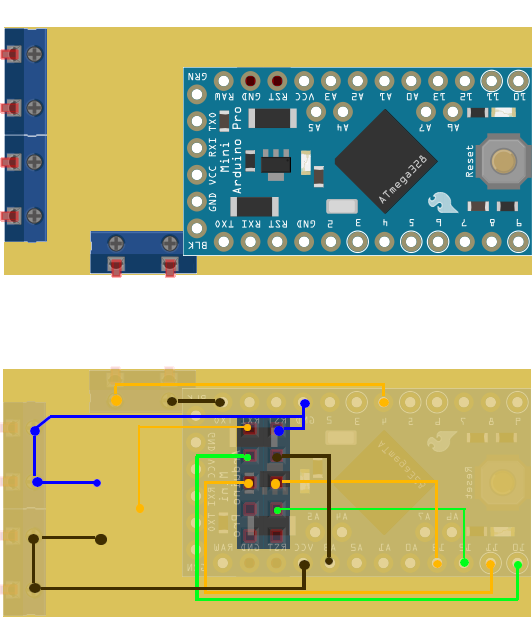
Diagram for ENC28J60 mini (3.3v)
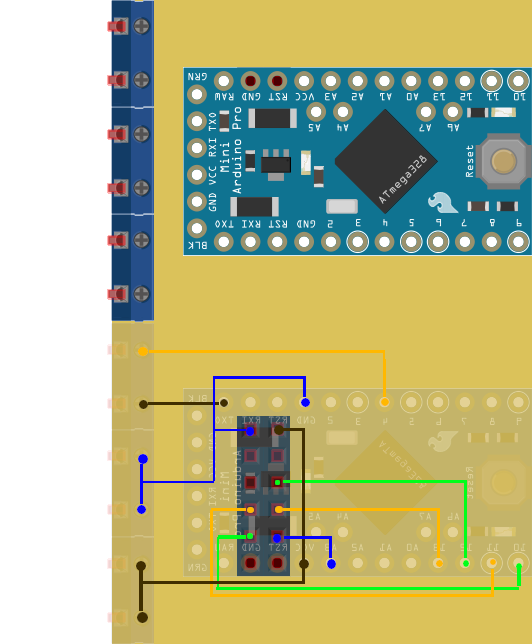
Diagram for 5V ENC28J60
Top with lid removed and screw terminal visible
Bottom with backfeed for screw terminal visible
Completed LED sleeves


notes
The cost per led sleeve is between €35,- and €85,- depending on your sources (local/ebay/scrap).
Some important notes:
- the correct winding is top to bottom, clockwise (seen from the top, i.e.: from top right to bottom left)
- I had old Arduino pro minis with old/wrong bootloaders: for these kinds, select Arduino Uno to be able to upload any sketch
- make sure you don't use other diameter pipes (like 75mm drain pipes) or your image will be garbled
- to solder the headers on the solder side, you have to offset them from the PCB (I used scrap plastic from zip ties)
- the power supplies on ebay are very dubious! They are refurbished (sloppy) and given the wire gauge I strongly doubt the were built for 8A continuous use. Don't leave them unattended
- feed the ledstrip from both sides to prevent discoloration
- the Arduino libraries can be a pain to find and/or get working. YMMV.
- for added safety, crimp your stranded wires; it's not worth risking fire for a couple of cents extra
- regarding the firmware[1], make sure to install these specific library versions (and no higher as these are the last working versions for this project):