Main Page
Link to Maintenance page
Welcome to ACKspace; a hackerspace located in Heerlen, The Netherlands.
A hackerspace is a place where people get together, socialize, share knowledge, tinker and build stuff.
In order to make this possible we have a collection of tools, (useful) stuff, work area and a lounge where we can relax and discuss our favorite games.
- Visiting address:
- ACKspace
- Kloosterweg 1
- 6412 CN Heerlen
- Building:"carbon6"
- Telegram:https://t.me/ACKspacepub
- Twitter:https://twitter.com/ACKspace
- Mail: see the communication page
- Telephone:+31-45-71-12345
Welkom bij ACKspace; een hackerspace in Heerlen, Nederland.
Een hackerspace is een plek waar mensen samenkomen, socializen, kennis delen, knutselen en dingen bouwen.
Om dit mogelijk te maken hebben we een verzameling gereedschap, (bruikbaar) spul, een werkruimte en een lounge waar we kunnen ontspannen en onze favoriete spellen kunnen bespreken.
- Bezoekadres:
- ACKspace
- Kloosterweg 1
- 6412 CN Heerlen
- Gebouw:"carbon6"
- Telegram:https://t.me/ACKspacepub
- Email: see the communication page
- Telefoon:+31-45-71-12345
Willkommen bei ACKspace; ein Hackerspace in Heerlen, Niederlande.
Ein Hackerspace ist ein Ort, an dem Menschen zusammenkommen, Sozialisieren, Wissen teilen, Dinge basteln und bauen.
Um dies zu ermöglichen, haben wir eine Sammlung von Tools, (nützliche) Sachen, einen Arbeitsbereich und eine Lounge, wo wir uns entspannen und unsere Lieblingsspiele diskutieren können.
- Besuchsadresse:
- ACKspace
- Kloosterweg 1
- 6412 CN Heerlen
- Gebäude:"carbon6"
- Telegram:https://t.me/ACKspacepub
- Email: see the communication page
- Telefon:+31-45-71-12345
- ACKsession (Meeting, 27 September 2025)
- Pizza-meet (Meeting, 4 October 2025)
- Movie night (Party, Meeting, 4 October 2025)
- Gameathon (Hackathon, 11 October 2025)
Featured articles:
LoRa pager
| Project: Main Page | |
|---|---|
| Featured: | Yes |
| State | Completed |
| Members | Xopr |
| GitHub | No GitHub project defined. Add your project here. |
| Description | GRAND CENTRAL :: HACK THE PLANET |
| Picture | |
| No project picture! Fill in form Picture or Upload a jpeg here | |
synopsis
Modify the famous Motorola Advisor (from the movie Hackers) so it listens to the LoRa band.
ingredients
- Motorola Advisor I with single AAA battery
- RFM95 SX1276 module with helix antenna
- step-up (boost) converter to 3.3v
- Arduino pro mini 3.3v
- RSS.EXE (for resetting password) and ADVISOR.EXE
- optional but advised: programming jig with pogo pins
- AdvisorRadio.ino that translates LoRa messages into POCSAG 512
Basically, Pena Sarajärvi did all the heavy lifting back in 2021[1]
information snippets
external pager header pinout:
- TDO (RxD) top
- RDI (TxD) middle
- GND bottom
2400 baud 3.3v (probably 5v tolerable)
pinout of the mini header inside the pager (small pitch, maybe 1mm):
- B++
- GND (connected to Arduino, RFM95 and step-up converter)
- B+ (connected to step-up converter)
- LIM_DATA (connected to Arduino)
- A0/SDI/MOSI
- A1/SCK
- A2/SS (connected to Arduino)
- NC/Audio
command to send a message using LilyGO TTGO LoRa32 868MHz ESP32 with a better antenna, running OpenMqttGateway 1.8.1:
mosquitto_pub -h <IP> -t "ackspace/OMG_ESP32_LORA/commands/MQTTtoLORA" -m '{"message":"0118999:Hack the planet! "}'
result
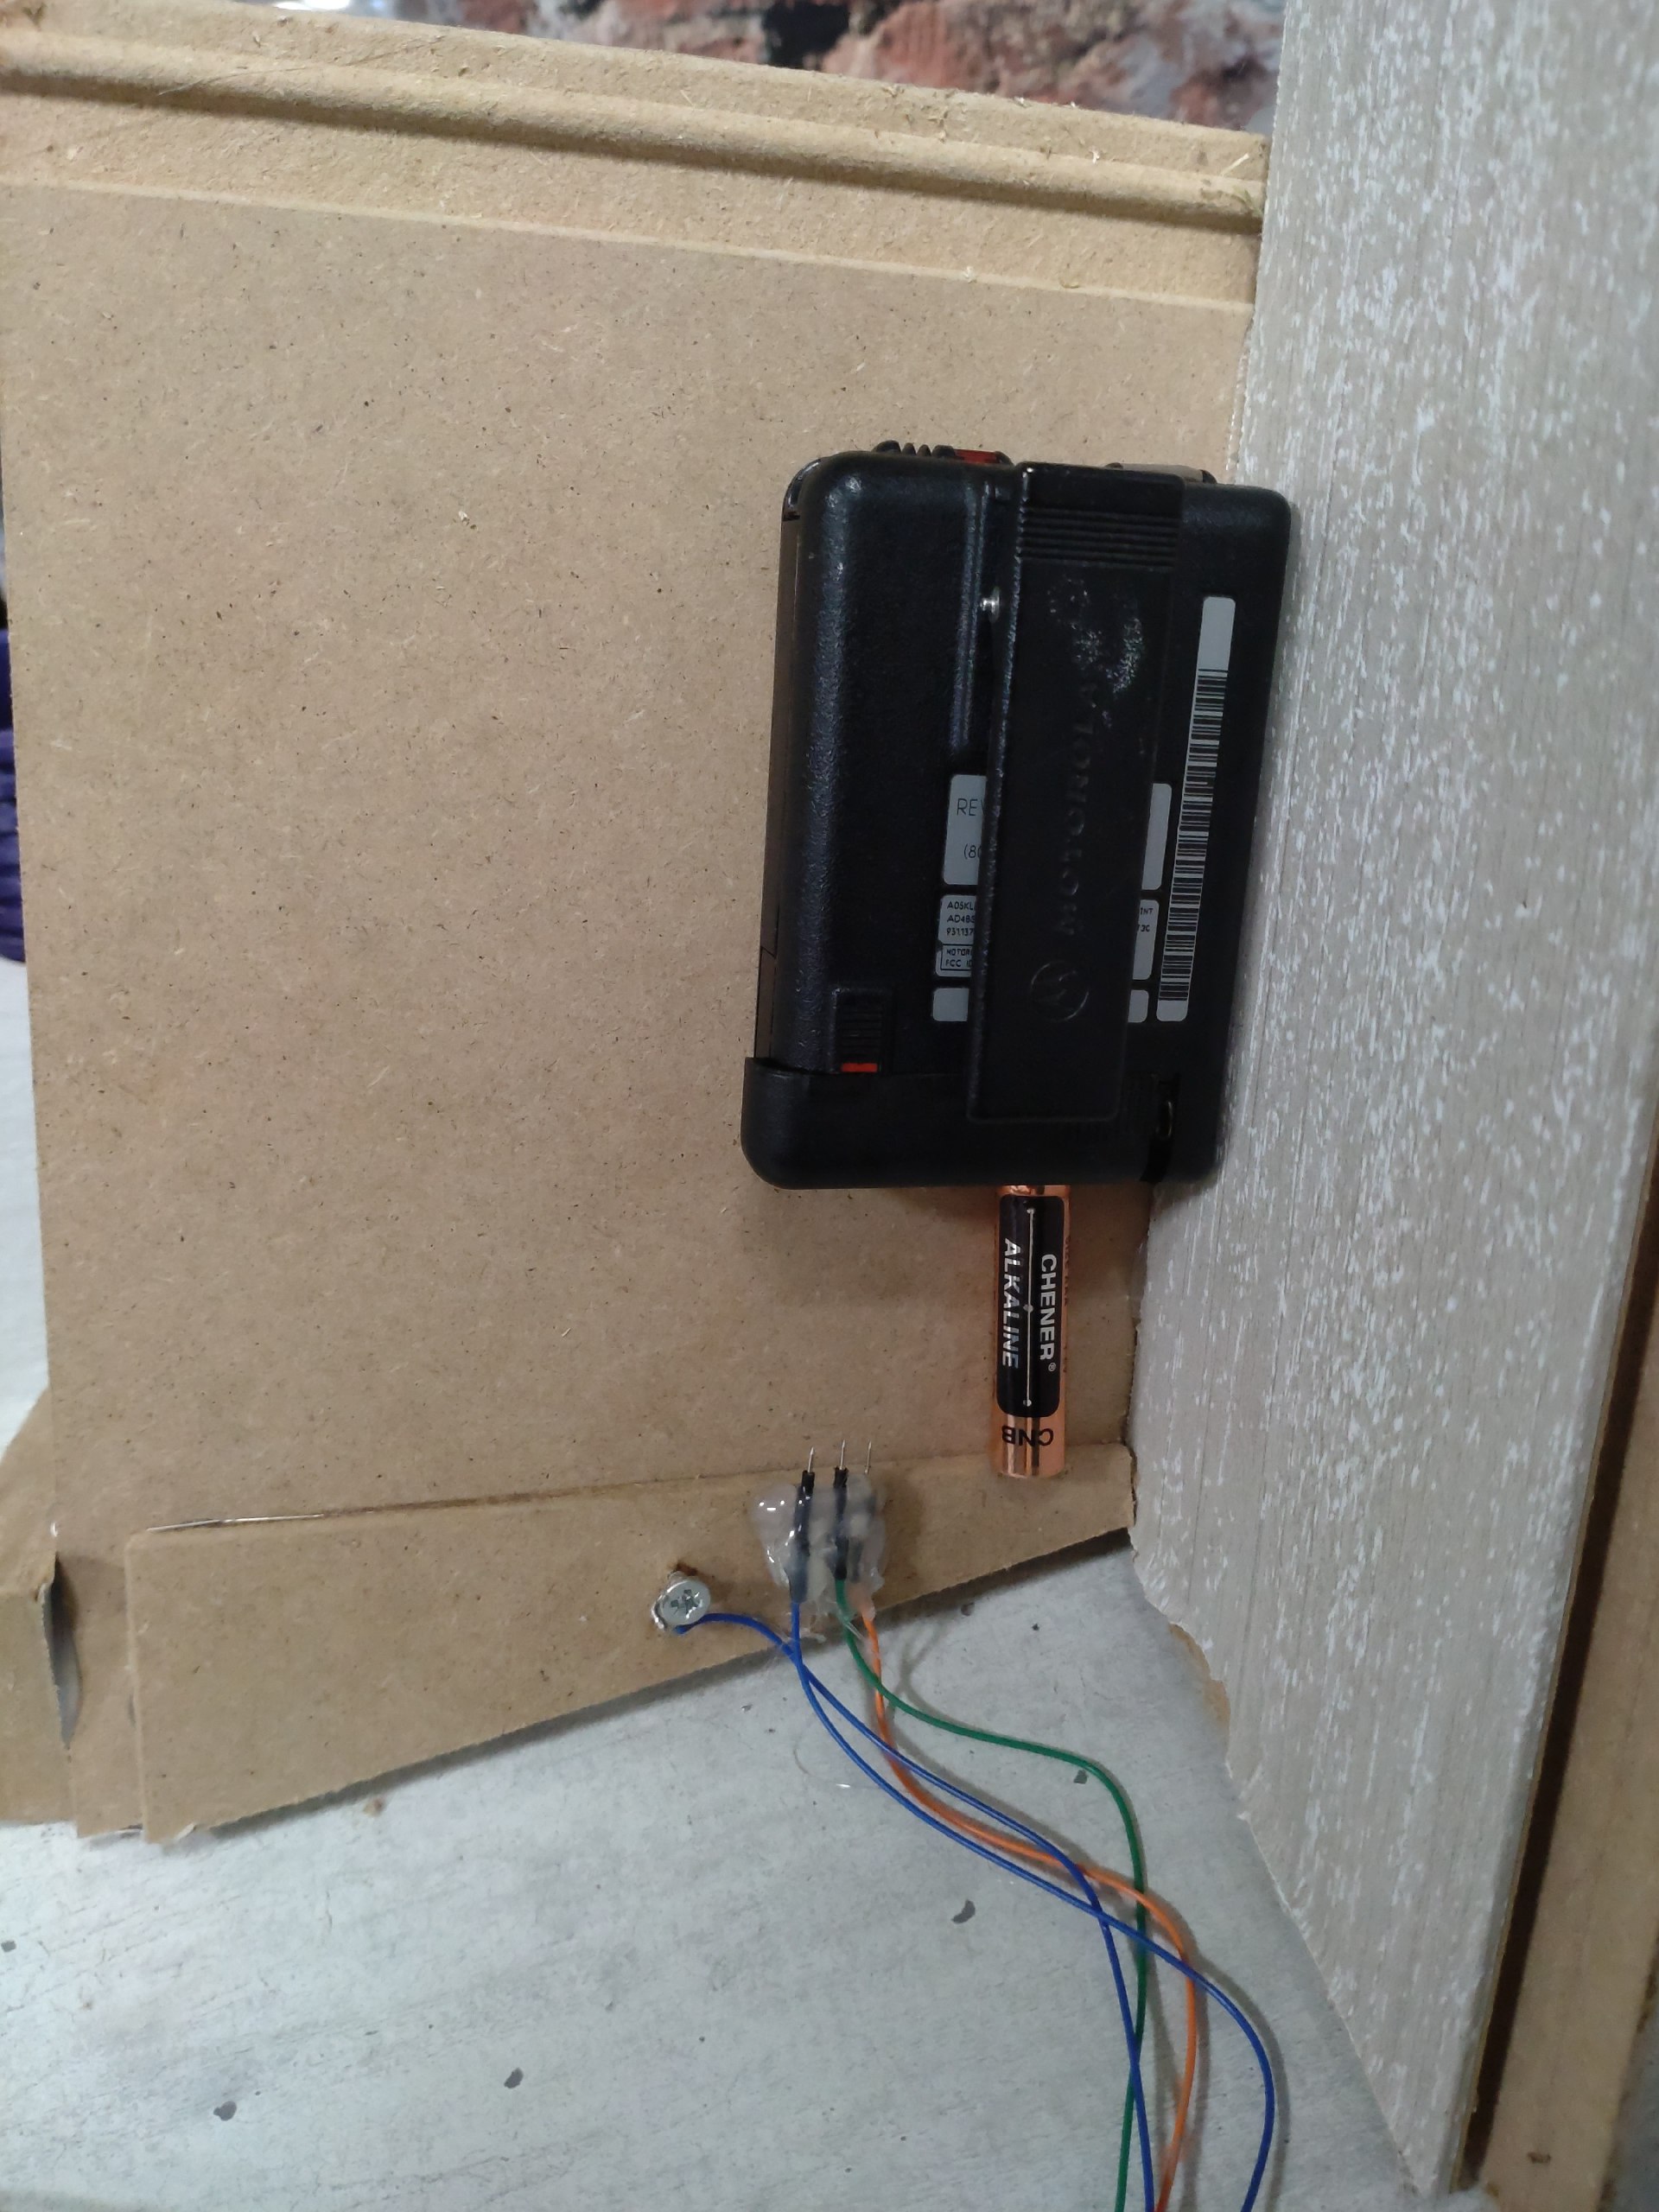
really jank jig
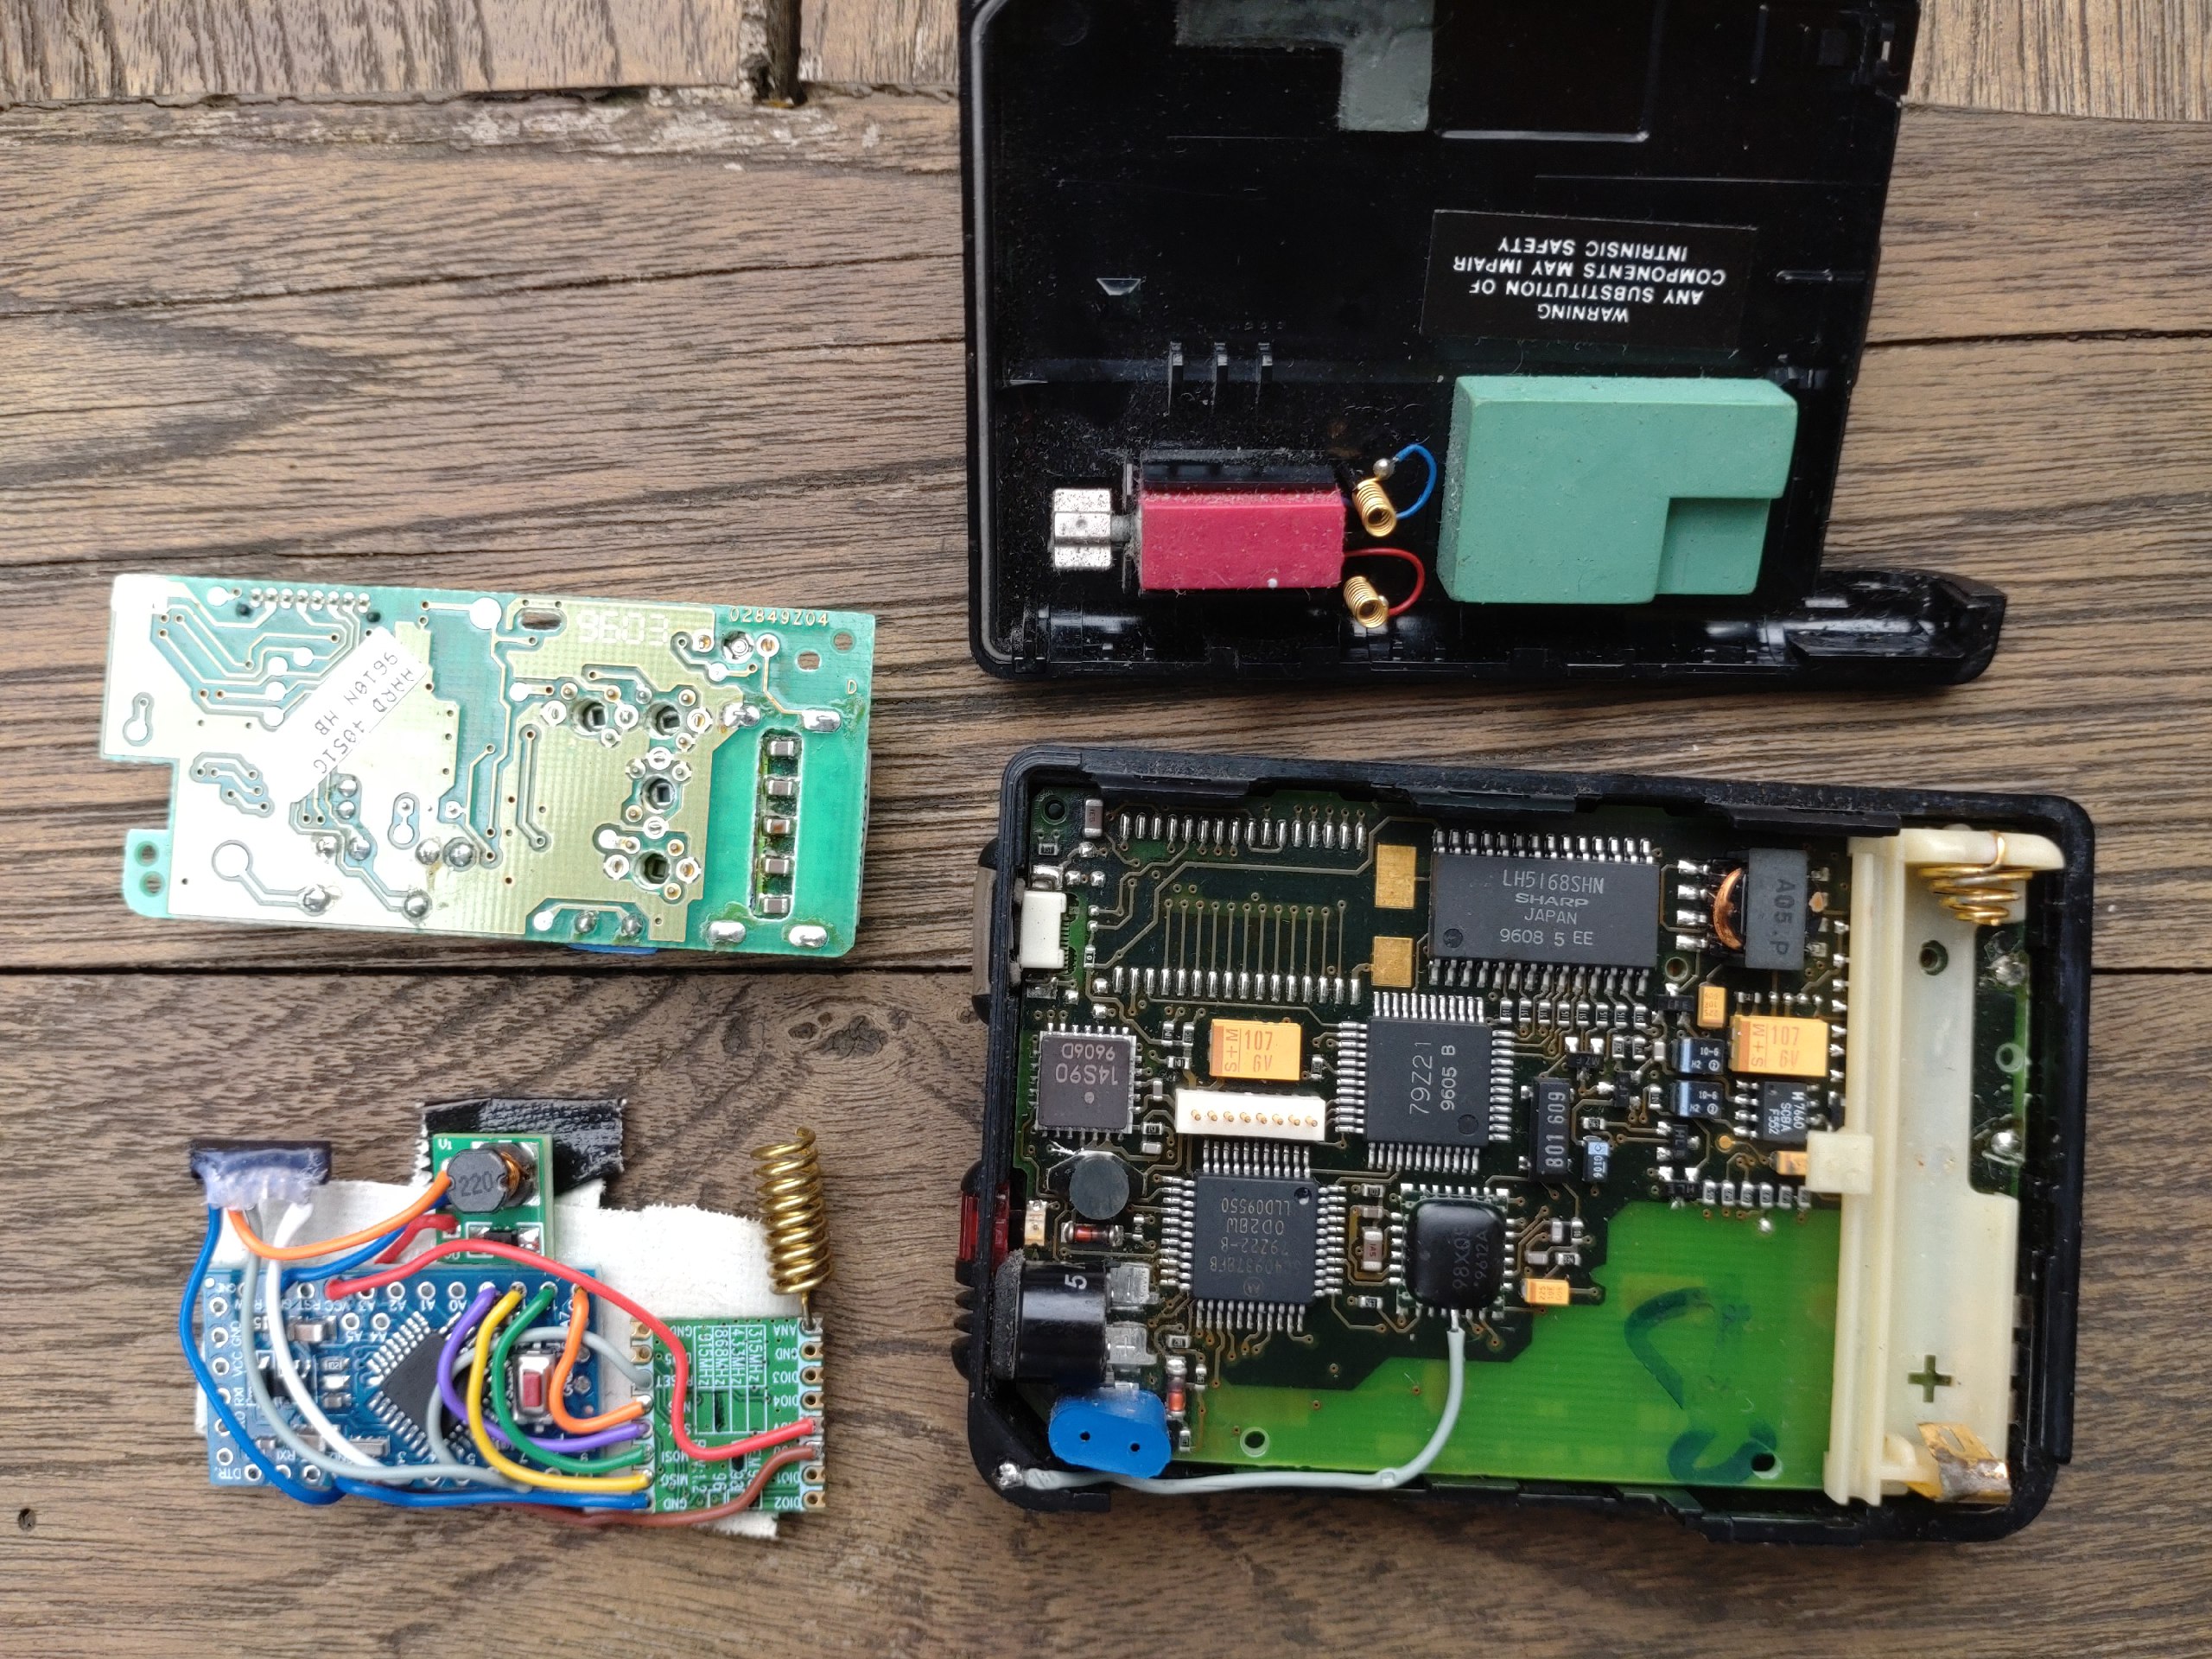
separate parts
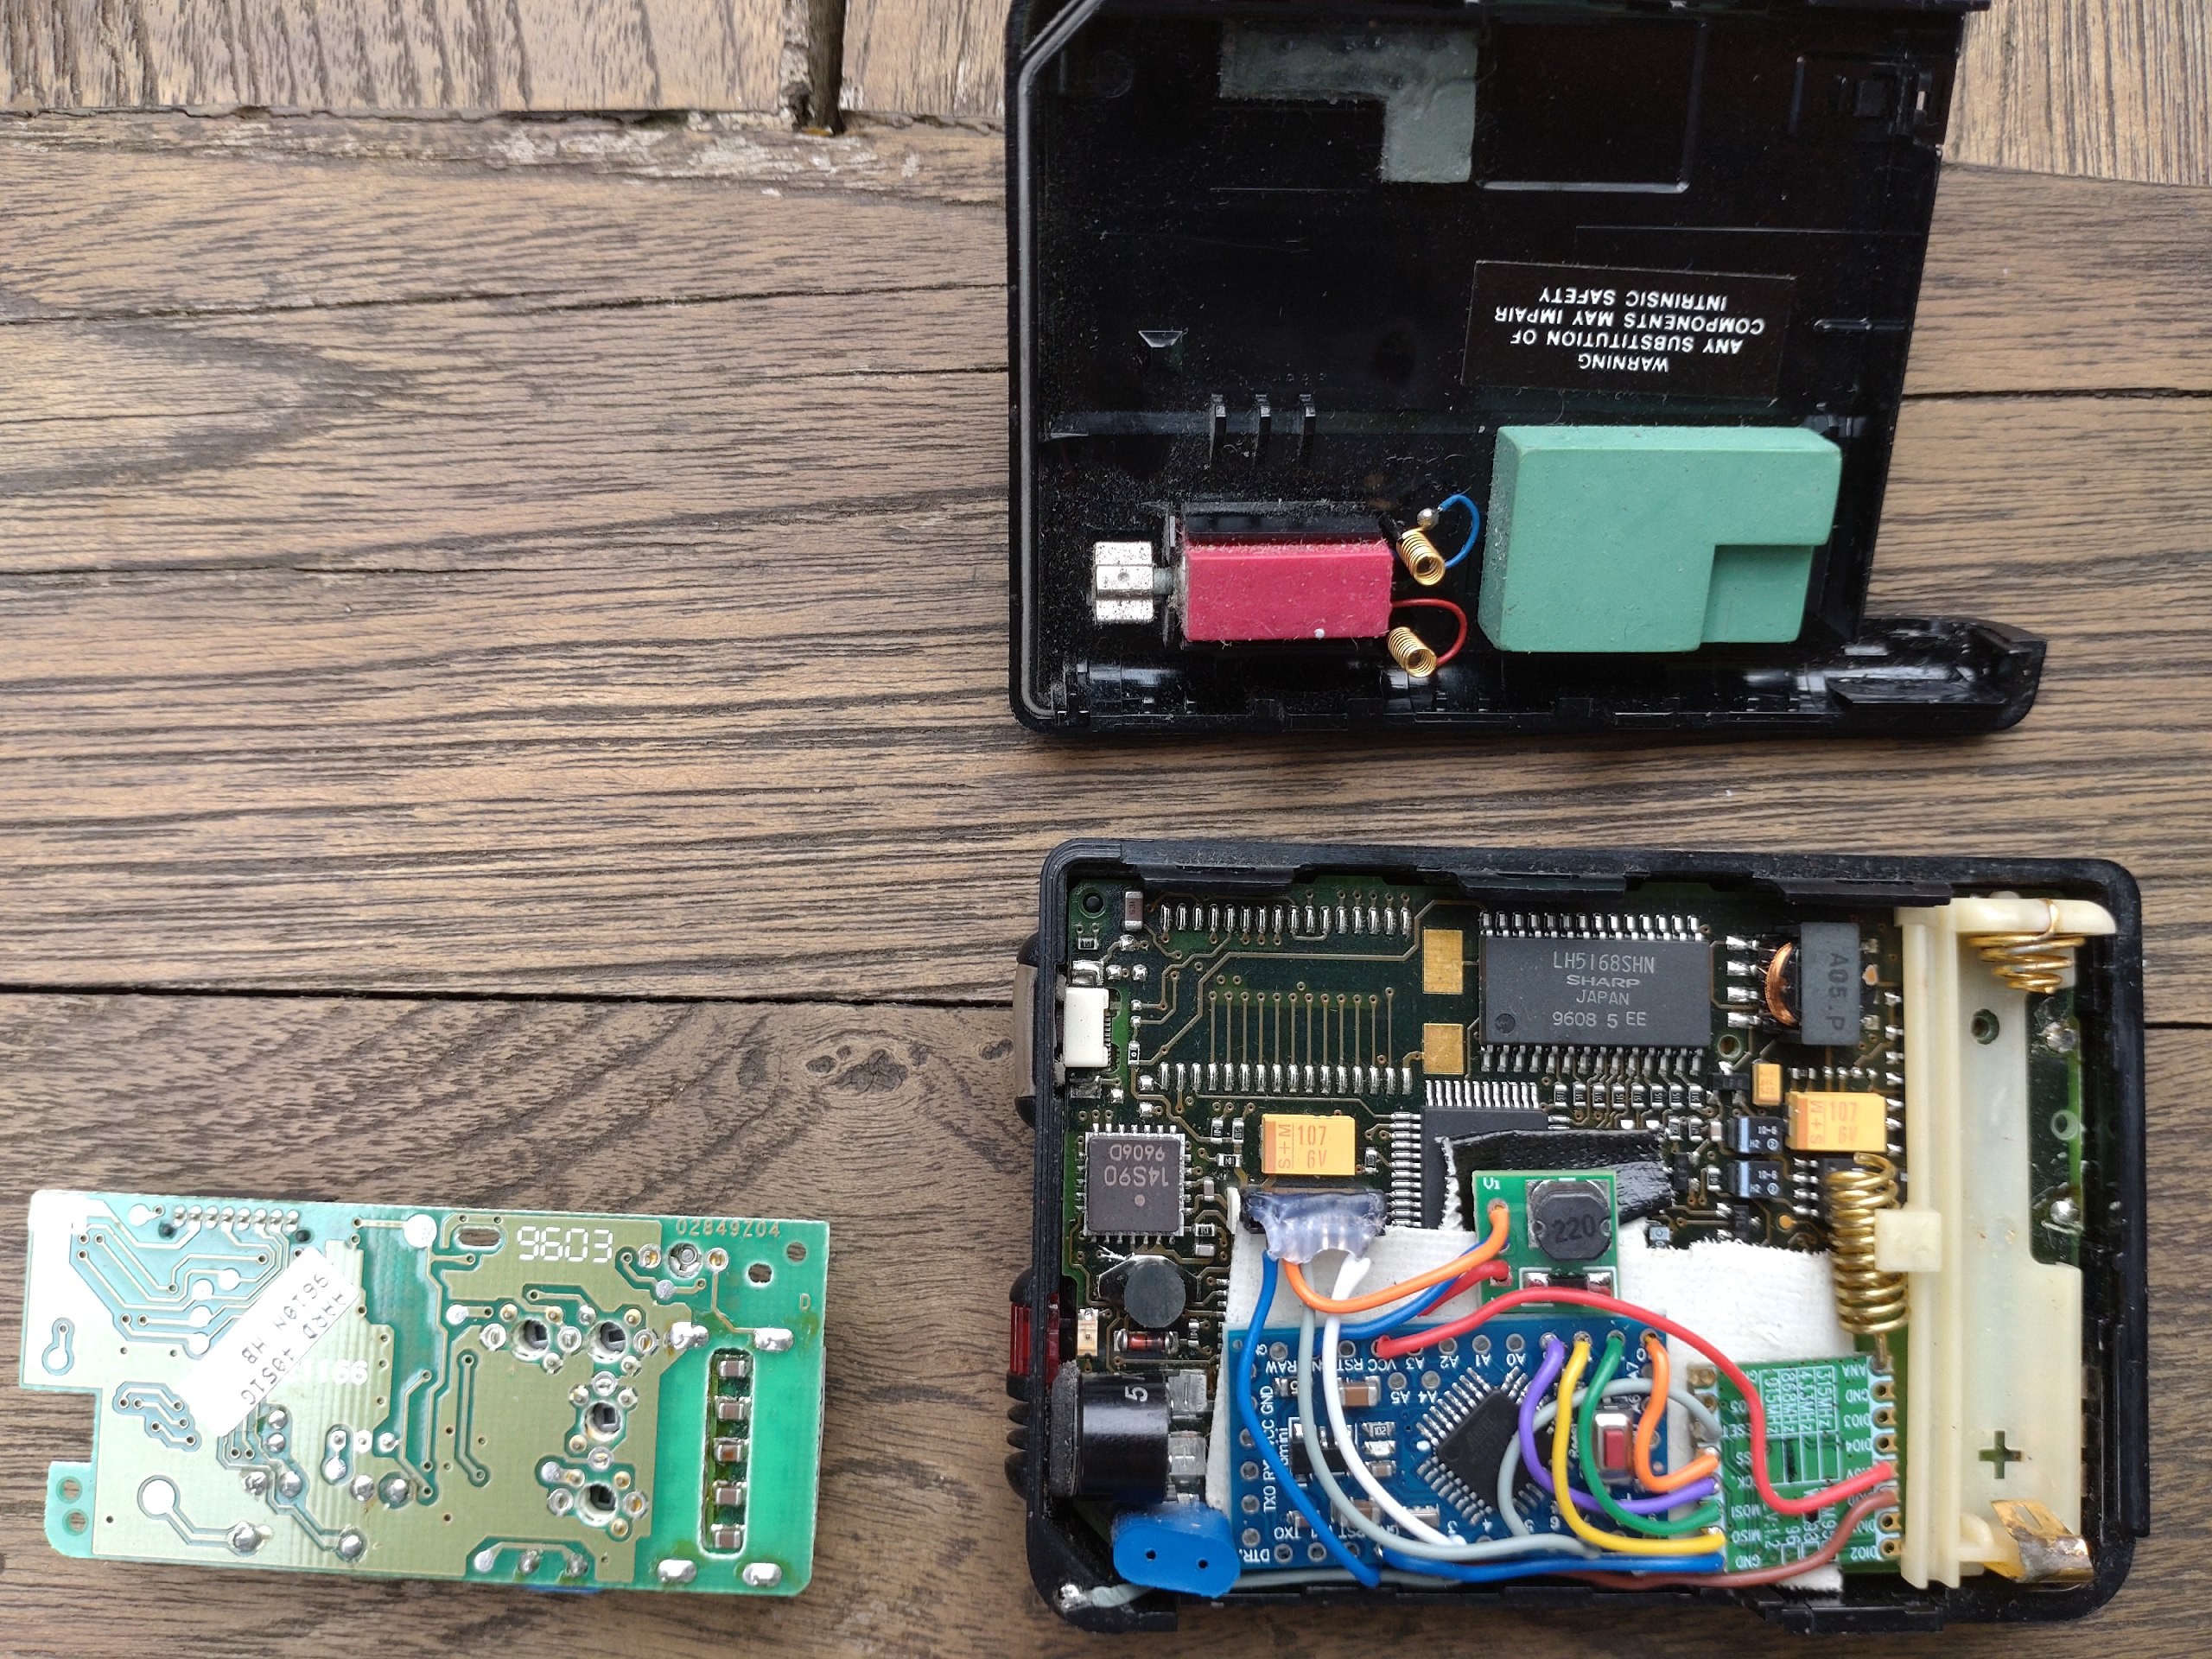
LoRa module in place


Some notes:
- the range is a bit disappointing: successful transmission at a little over 100m line of sight using default settings on both pager and 'gateway'
todo
- files and commands
references
Movie night
| Event: Main Page | |
|---|---|
| Featured: | Yes |
| State: | Planned |
| Start date: | 2025/10/04 |
| Start time: | 20:00:00 |
| End date: | 2025/10/04 |
| End time: | 22:00:00 |
| Contact: | xopr |
| Kind: | Meeting, Party |
| Location: | Location::online |
| URL: | |
| Fee: | |
| Short description: | Movies to see! |
New movie night planned, on Wednesday, 12 November, 2:01!
what movie(s)?

Monday, September 15th 2025, Hackers became 30 years old! Time to grab your inline skates, box of floppies and a can of Jolt: it's movie time!
Gameathon
Gameathon 2025 October Edition
Always wanted to build your own game or alter an existing one to your own taste? This is the time to do it!
Our goal is to make something playable (and fun!) in just one weekend.
Maybe you would like to make a game for our arcade machine or surface table?
Or design your own pixel art video game?
Or put our 3D printers to good use and create your very own tabletop game?
This weekend is about building your game your way!
Is it for me?
No matter your skill-set or interests, there is something for everyone: scenario-writing, music, dialogue, drawing, programming, design, crafts, and more.
Using pre-made assets is no problem, just make sure that you have the necessary rights to use them, and attribute them in your game’s description properly.
Whether you create something on your own, as a duo or in a group is up to you.
Participating is free!
Location
You can find us at Carbon6, room L406
Kloosterweg 1
6412 CN
Should you not have keys to enter the building yourself, give us a call (+31-45-71-12345) and we will come to pick you up and guide you to ACKspace.
Registration
Please register for this event by sending us an email on info@ackspace.nl.
Bring your laptop, tablet or any other material you would like to use (drawing tablets, music instruments, crafts, etc.).
Lunch will be provided by ACKspace. Drinks and snacks are available for a fee. Dinner (pizza) is at your own expense.
TrafficSlight
| Project: Main Page | |
|---|---|
| Featured: | Yes |
| State | Active |
| Members | Xopr |
| GitHub | trafficslight |
| Description | Mini traffic light from scrap material |
| Picture | |

| |
synopsis
Create small wireless traffic lights
ingredients
- OSB for the back
- old perforated print
- piece of thin PVC tube
- plastic egg "carton" cut in half as lens
- half plastic mayonase jar for the back
result

parts

built version

todo
- upload pics
- better firmware
Inkbird IBBQ-4T
| Project: Main Page | |
|---|---|
| Featured: | Yes |
| State | Active |
| Members | xopr |
| GitHub | No GitHub project defined. Add your project here. |
| Description | Cloudless Inkbird IBBQ-4T |
| Picture | |
| No project picture! Fill in form Picture or Upload a jpeg here | |
synopsis
Remove Barbecue temperature sensor from the cloud, adding it to Home Assistant.
xopr had some gift cards to spare and paid €69,- for it (noice!)
requirements
- ESP-12 module flashed with Tasmota using a programming jig (or in-circuit with extra reset jumper)
- solder iron + solder
- desoldering iron or lots of solder
- hairdryer or equivalent
- small philips screwdriver
- flat screwdriver or spudger
- utility or exacto knife
- (optional) wires for in-circuit programming
hardware
The thermometer has a backlit display, beeper, USB-C charge (only) port and a 7.4Wh 3.7v battery. It's wireless part is based on Tuya: a Chinese IoT cloud provider and the first revision had an Espressif wifi chip. This version has a WBR3 module based on Realtek chips which is incompatible with the current open source solutions.
The only way is to replace the module with an ESP-12, pull GPIO15 low and CH_PD high with a 10-20k resistor.


opening and replacing the module
- grab a hairdryer and utility/exacto knife
- heat the front plate and pry open carefully to not scratch off the paint. The adhesive is foamy so pushing the knife too far might make it curl up
- use small philips screwdriver to open up the case and remove the board (USB-C side first; bend the case a bit, and don't lose the knob)
- remove the Realtek module
- solder on the ESP module (either pre-programmed or solder extra wires)
- solder a resistor between CH_PD and VCC and one between GND and GPIO15
- if you want to program in-circuit, keep the Tuya MCU in reset by bridging
ResetandGNDon the breakout pads while flashing the ESP
firmware settings
After connecting to Tasmota, go to Configuration -> Other and set template
{"NAME":"Tuya","GPIO":[0,2272,0,2304,0,0,0,0,0,0,0,0,0,0],"FLAG":0,"BASE":54}
Next, go to console and enter the following commands:
- set as template module (using TuyaMCU):
module 0 - set baudrate to 115200:
SetOption97 1 Backlog TuyaMCU 99,1; TuyaMCU 11,19; TuyaMCU 35,101; TuyaMCU 81,102; TuyaMCU 12,104- Add two rules and activate them. The first rule sets an enum value for the mute button, the second one publishes the raw hex values on the probes subtopic:
Rule1 ON power1#state=1 DO TuyaSend4 19,1 ENDON ON power1#state=0 DO TuyaSend4 19,0 ENDON
Rule2 ON TuyaReceived#DpType0Id107 DO Publish stat/%topic%/probes %value% ENDON
Backlog Rule1 1; Rule2 1
- Set button names:
Backlog WebButton1 F/C; WebButton2 Mute
home assistant
Note that the published hex value contains 4x8 hex characters as little endian farenheit values where the first byte is ignored (it seems to toggle between 0 and 1)
In the configuration.yaml file, set the following:
mqtt:
  sensor:
    - name: "Barbecue probe 1"
      state_topic: "stat/tasmota_5B7316/probes"
      unique_id: "barbecue_probe_1"
      value_template: "{{(0xffff * value[6:8] | int(base=16) + 0xff * value[4:6] | int(base=16) + value[2:4] | int(base=16)) / 100 }}"
      unit_of_measurement: "°F"
      device_class: temperature
    - name: "Barbecue probe 2"
      state_topic: "stat/tasmota_5B7316/probes"
      unique_id: "barbecue_probe_2"
      value_template: "{{(0xffff * value[14:16] | int(base=16) + 0xff * value[12:14] | int(base=16) + value[10:12] | int(base=16)) / 100 }}"
      unit_of_measurement: "°F"
      device_class: temperature
    - name: "Barbecue probe 3"
      state_topic: "stat/tasmota_5B7316/probes"
      unique_id: "barbecue_probe_3"
      value_template: "{{(0xffff * value[22:24] | int(base=16) + 0xff * value[20:22] | int(base=16) + value[18:20] | int(base=16)) / 100 }}"
      unit_of_measurement: "°F"
      device_class: temperature
    - name: "Barbecue probe 4"
      state_topic: "stat/tasmota_5B7316/probes"
      unique_id: "barbecue_probe_4"
      value_template: "{{(0xffff * value[30:32] | int(base=16) + 0xff * value[28:30] | int(base=16) + value[26:28] | int(base=16)) / 100 }}"
      unit_of_measurement: "°F"
      device_class: temperature
todo
- ignore the sensor if it is not plugged in (there is a bitmask command but it's safe to assume >1000 degrees is not a realistic value
- add instructions/commands to set display timer, temperature alarm and other stuff
links
- Superb research information here: https://community.home-assistant.io/t/inkbird-bbq4t-local-control/309433/7
- Link to google spreadsheet containing the specific Tuya commands: https://docs.google.com/spreadsheets/d/1hQ805Ksk2wpGK8vPj0LHx7F3GaqZKFMFnVoLVZFEPiw/edit?gid=0#gid=0